Hi Timateo, glad to hear you like the series
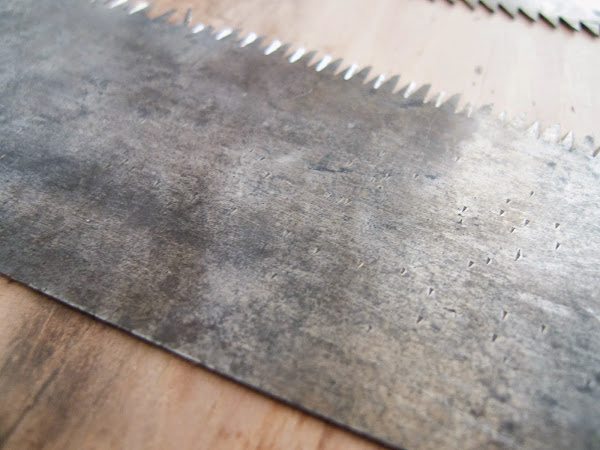
If the saw is old enough, it may be just fine. As Chris says, the teeth are very hard and brittle, but this is just a surface thing. What they do is to send and electric impulse that heats the metal because of it's resistance to the electric current. But electric conduction happens on the surface of the metal only, so as the teeth wear, the hard surface wears away and just the soft core - no pun intended- remains.
Or at least that's my theory. I only have sharpened a Z-Saw H-150 Dozuki ultra-fine crosscut saw, and I used both a small diamond triangular file and a normal one. The normal one worked perfectly wherever the blue colour of the teeth had wore off. It was a very old blade, so there was a lot of wear. (It was used on a violin shop, so it cuts mostly ebony.) I think the z-saw have a tooth by tooth hardening method that may be different for other brands.
I have this ongoing discussion with a friend, he insists you need a diamond file to sharpen disposable blades and I that you don't. It all comes down to how far the hardening goes into the metal, but I haven't been able to find that info anywhere. It would be great to hear your experience. Take a look at this:
https://www.youtube.com/watch?v=rUoPXDzyJ7Q
That looks like a disposable blade and a normal file to me... I'm really curious to hear other people's experiences.
If the teeth were too hard to file, maybe try "cleaning" them with sandpaper or a fine diamond file first. Then sharpening.
So I'd say give it a try and tell us how it went. Worst case you will get some practice. Then get a real saw, they are cheaper than the disposable ones and the steel is much nicer, softer and with a more defined structure (or so it seems to me).
Sharpening japanese style
- Sebastian Gonzalez
- Sweeper of Floors, Maker of Tea
- Contact:
- Location: Graz, Austrua
- Sebastian Gonzalez
- Sweeper of Floors, Maker of Tea
- Contact:
- Location: Graz, Austrua
Post
Re: Sharpening japanese style
I found a video that has the best zoom in on the sharpening process and the worst tv show ever. It shows how to make the madonoko pattern, with the help of a grinder.
worth a watch if you can stand the stupid comments from the girl. I mean the stupid voice, I have no idea what they are saying, but I bet they are not talking about how the saws are forged.
https://www.youtube.com/watch?v=FzOdO466FPg
worth a watch if you can stand the stupid comments from the girl. I mean the stupid voice, I have no idea what they are saying, but I bet they are not talking about how the saws are forged.
https://www.youtube.com/watch?v=FzOdO466FPg
- Mathieu
- Triple 2
Post
Re: Sharpening japanese style
Funny to see this video and recognize the box we used to send our saws to Nagakatsu-san. He is a very skilled sharpener and luckily for us he has two apprentices at the moment who might continue their trade.
I really wish he could join the conversation as I am sure he is one of the few who could really give some accurate advise on saw sharpening.
Tensioning the blade is one of the most important aspects and even after several explanations regarding this subject by Nagakats it remains unclear to me. Let alone that I would even consider trying it myself. To me filing the teeth of a saw seems something you could learn given enough practice but tensioning the blade seems to require a whole different level of insight, experience and dedication.
Below is a drawing of him it might be useful for those who are planning to make this saw vise.
...
- Paul Atzenweiler
- Deshi
- Contact:
- Location: Kansas City, MO
Post
Re: Sharpening japanese style
Today I did some aggressive filing on one of my rip saws. I'm not posting the pictures because I think I did a good job, I'm actually struggling with this saw. I also had some issues with photographing the teeth from the end view. Hopefully they are good enough. I filed the teeth 90 degrees to the blade and the back of the teeth are angled due to lowering the handle of the file and tilting the saw vice away from me. After jointing the teeth I filed until the shiny spot on top was gone. I was happy until I tried making a cut. I ripped some Poplar (super easy wood to saw). Even though I thought the teeth were sharp and even - the saw skipped did not feel good at all. You may see from one of the photos that the saw has a slight twist to it. I don't think that contributed that much to the bad cutting, although I want to address it. I am posting this just to show that this can be a frustrating process.
I loved the video you posted the link to and you are right - even though I can't understand Japanese I don't like listening to the interviewer. You may be able to explain to me part of the video. At about 3:43 into the video there is a close up of the teeth. Does this gentleman file the front of one tooth and the back of the one in front of it with the same file stroke (like common Western saw sharpening)? How did you post the video link by the way?
I think saw sharpening is going to be a long journey for me . . .
- Attachments
-
- rip teeth 5.jpg (165.6 KiB) Viewed 24600 times
-
- rip teeth 4.jpg (162.01 KiB) Viewed 24600 times
-
- rip teeth 3.jpg (152.93 KiB) Viewed 24600 times
-
- rip teeth 2.jpg (133.52 KiB) Viewed 24600 times
-
- rip teeth 1.jpg (115.09 KiB) Viewed 24600 times
- Paul Atzenweiler
- Deshi
- Contact:
- Location: Kansas City, MO
Post
Re: Sharpening japanese style
I also have another question. When you talk about "tensioning" , do you mean flattening/straightening? Or is it something different?
- Sebastian Gonzalez
- Sweeper of Floors, Maker of Tea
- Contact:
- Location: Graz, Austrua
Post
Re: Sharpening japanese style
hartelijk bedankt for the drawing Mathieu. It's nice to see the "real" size. I was off by 2cm.
I used to think the same concerning the tensioning... but now I'm leaning towards the "it cannot be so difficult". I mean, it's just a piece of metal that you dent in such a way that becomes stiffer along one direction, how difficult can that be? I need a phd student who can do FEM, then I could use his dedication to run simulations of saw tensioning
Paul, tensioning is something different from straightening. Straight is a geometric property while tensioning is a structural property.
From the saws I have, the metate accomplished the tensioning by denting the saw in certain places. I've seen triangular marks and lines, and in one saw the setting hammer was used. The marks look like this:
In this particular saw, the other side has the triangles pointing on the other direction, which makes me think of some kind of twist correction.
In other saw, they are just below the teeth in some parts, in both faces.
What you are doing with these dents is to create small stress zones in the blade, that will affect the way the saw resonates, so it feels "stiffer" when you are cutting. Of course you need to know where to create these stress zones and that's the art.
Concerning the video, no. He files each facet independently, and that's the tricky thing in smaller saws, not to touch the next tooth when you are filing one. If you touch it, you will create a hole in the tooth's base, like the ones you find sometimes in ebay saws.
Finally, I think you need to touch one more time the teeth, in picture 2 looks like there is still a bit of steel left. Also, I would go for a back facet also perpendicular to the blade if you want it for ripping, like that you take bigger chucks of wood with each tooth. A way I found to recognise a sharp rip saw from a not so sharp saw is by the sound when cutting, the sharp saw will make a continuous higher pitch sound while the not so sharp will make rat-rat-rat-rat and lower pitch. Looking good though, you kept a steady hand on those back facets.
- Paul Atzenweiler
- Deshi
- Contact:
- Location: Kansas City, MO
Post
Re: Sharpening japanese style
At one point my saw started crying and begging for mercy - is that normal?
- Sebastian Gonzalez
- Sweeper of Floors, Maker of Tea
- Contact:
- Location: Graz, Austrua
Post
Check the set of your teeth, sounds like the saw is jamming. It may also be the twist, in which case I have no idea what to do.
Re: Sharpening japanese style
Most definitely not. What I've learnt on this time is that sawing must be an straightforward thing. Even in really hard woods it's only slower, not harder. You just need sharp teeth.Paul Atzenweiler wrote:At one point my saw started crying and begging for mercy - is that normal?
Check the set of your teeth, sounds like the saw is jamming. It may also be the twist, in which case I have no idea what to do.
- Paul Atzenweiler
- Deshi
- Contact:
- Location: Kansas City, MO
Post
Re: Sharpening japanese style
I refiled all the teeth again. Jointed and filed (didn't reset). This time the file was held flat and 90 degrees to the blade. The results were a usable saw that was not perfect. In all honesty I don't think this saw is of any great quality because I have been able to perform some straightening simply by bending it in my hands. Anyway I did an impromptu resaw test and a quick planing for a bookmatch from the scrap box. The wood is Poplar (as before) and didn't fight me too much.
- Attachments
-
- First side finished. I file the teeth with them pointing towards me.
- bookmatch 6.jpg (181.58 KiB) Viewed 24585 times
-
- Finished teeth with some imperfections.
- bookmatch 4.jpg (225.13 KiB) Viewed 24585 times
-
- My filing set up.
- bookmatch 3.jpg (142.16 KiB) Viewed 24585 times
-
- bookmatch 2.jpg (207.09 KiB) Viewed 24585 times
-
- bookmatch 1.jpg (156.54 KiB) Viewed 24585 times
- Sebastian Gonzalez
- Sweeper of Floors, Maker of Tea
- Contact:
- Location: Graz, Austrua
Post
Re: Sharpening japanese style
Nice Rorschach test Paul
Glad to hear you have a functional saw now. Weird to hear about the bending. Maybe the edge is welded to a softer iron or more like a not hardened piece of steel?
I really like those banksy stencils in your workbench.
Glad to hear you have a functional saw now. Weird to hear about the bending. Maybe the edge is welded to a softer iron or more like a not hardened piece of steel?
I really like those banksy stencils in your workbench.
Who is online
Users browsing this forum: No registered users and 5 guests