Page 2 of 4
Re: After Joint 2
Posted: Tue May 26, 2015 11:57 pm
by john verge
Is it possible that fashioning the sachi sen and their respective mortises are far beyond my woodworking reach? I haven't managed to execute it yet. I definitely lack the small tools and can't seem to muster enough understanding of the explanation given to have a crack at it. I'm feeling a draw bore and pin detail coming on. However, in your instructions Chris you included a pic at the end showing sachi sen of 1mm thickness? Thats intense by the way! Sorry for the confession, i know excuses rarely cut it.
Re: After Joint 2
Posted: Wed May 27, 2015 4:04 am
by Chris Hall
Appreciate the confession - sorry you're finding this project a struggle. Keep going, you'll find a way I'm sure.
If you are considering a draw bored pin a good idea for this connection...uh, well, perhaps reconsider. How's that going to work through or near a miter? This is not a situation where all the world is nails and you only have but a hammer to attend to things...
If there is something lacking in my explanation in the past mailing, please let me know.
I think that the pin itself is relatively easy to make, the trench is trickier bit by far.
At a minimum you will need a narrow thin chisel to cut the trench. If you need a skinny saw, you can either cut a saw blade up into a short narrow piece, or obtain a little saw blade for an x-acto knife like this:
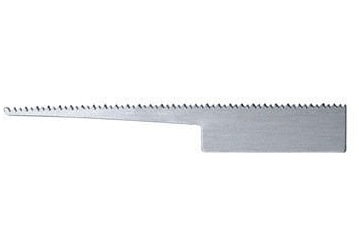
- x-acto.jpg (8.68 KiB) Viewed 6369 times
Or modify a hacksaw blade - imagination can come up with all sorts of solutions. Have no fear, there is no special 'shachi sen' chisel set you need to buy...
I didn't realize this joint was going to be so challenging for people as I have cut it so often and in so many different versions that it seems like a regular old sorta thing to deal with, so I'm surprised. I thought the biggest challenge was in explaining the trench geometry in detail....
This joint was a joint I tackled fairly early on in my learning process, funny enough. Here's a pic from 1997 or so with a model of a bargeboard joint I did as a gift- the fixing pin is not visible, but it is there above the carving:
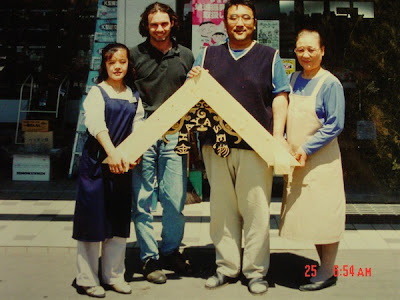
- DSC01490-small.JPG (42.51 KiB) Viewed 6369 times
Re: After Joint 2
Posted: Wed May 27, 2015 11:51 am
by john verge
Cool pic. So the double tenon miter with fixing pin is typically used for the gable barge rafter?
Re: After Joint 2
Posted: Wed May 27, 2015 3:19 pm
by Chris Hall
It's one application architecturally for that connection, however there are others. There are several types of barge board joints besides, mind you. Maybe we'll tackle one of those for the next project...
Re: After Joint 2
Posted: Wed May 27, 2015 9:05 pm
by Chris Hall
Are other members also stuck due to perceived tooling or technical difficulties?
Re: After Joint 2
Posted: Sat May 30, 2015 9:35 pm
by charlie
yup
Re: After Joint 2
Posted: Tue Jun 09, 2015 4:07 pm
by Chris Hall
So, weeks are passing since the last mailing.
I've provided an overview of a suggested cut out approach, and one person has gotten through that stage.
What I'm wondering is, quite simply, is where the rest of you are at in the process.
Have you...
-given up entirely?
-gotten way too frustrated and can't face dealing with this right now?
-burnt the pieces to hide the evidence?
-ordered some special tool and are waiting for it to arrive?
-begun to hope for divine intervention?
-found you have absolutely no time to devote to this?
I'd be interested to hear from folks who are not complete but who did manage the basic cut out after the first couple of mailings, to get an idea of where you're at, and when you think you might complete this. I'd like to start preparing materials for the next project and it would be helpful to get a sense of the schedule.
Re: After Joint 2
Posted: Tue Jun 09, 2015 7:05 pm
by Jon B
My joint came to a standstill because I've been fully occupied helping a friend with the woodwork for a Japanese restaurant. However, that will be wrapping up soon, and as soon as I get a chance I'm planning to complete this project. When I last left it, I had a bit more paring to fit the tenons and miter before the cutout for the satchi-sen.
Re: After Joint 2
Posted: Tue Jun 09, 2015 8:06 pm
by Chris Hall
Do you work with Yann?
Re: After Joint 2
Posted: Tue Jun 09, 2015 9:14 pm
by Jon B
Yeah, I've been helping him out for this project, and hopefully more.