Where we left off, we had looked at basic connections between stretcher and post, working with a stretcher which is about 1/3 as wide as the post face, concluding with a joint in which the stretcher passes through a mortise in the post, and is secured with a pin. That joint provided strength against loads lifting the stretchers or pushing them down, and if well fitted and fitted in multiples, good resistance to shear. However, if the load path was one in which the stretcher is pulled or pushed, a peg is neither strong enough or stiff enough to be a good option.
One of the main functions of a stretcher is to prevent the post from shifting position under load. A loaded post will eventually try to convert some of those loads into lateral deflection and or bowing. A stretcher can act like a strut or a tie, or both, in terms of how it mechanically interacts with the post.
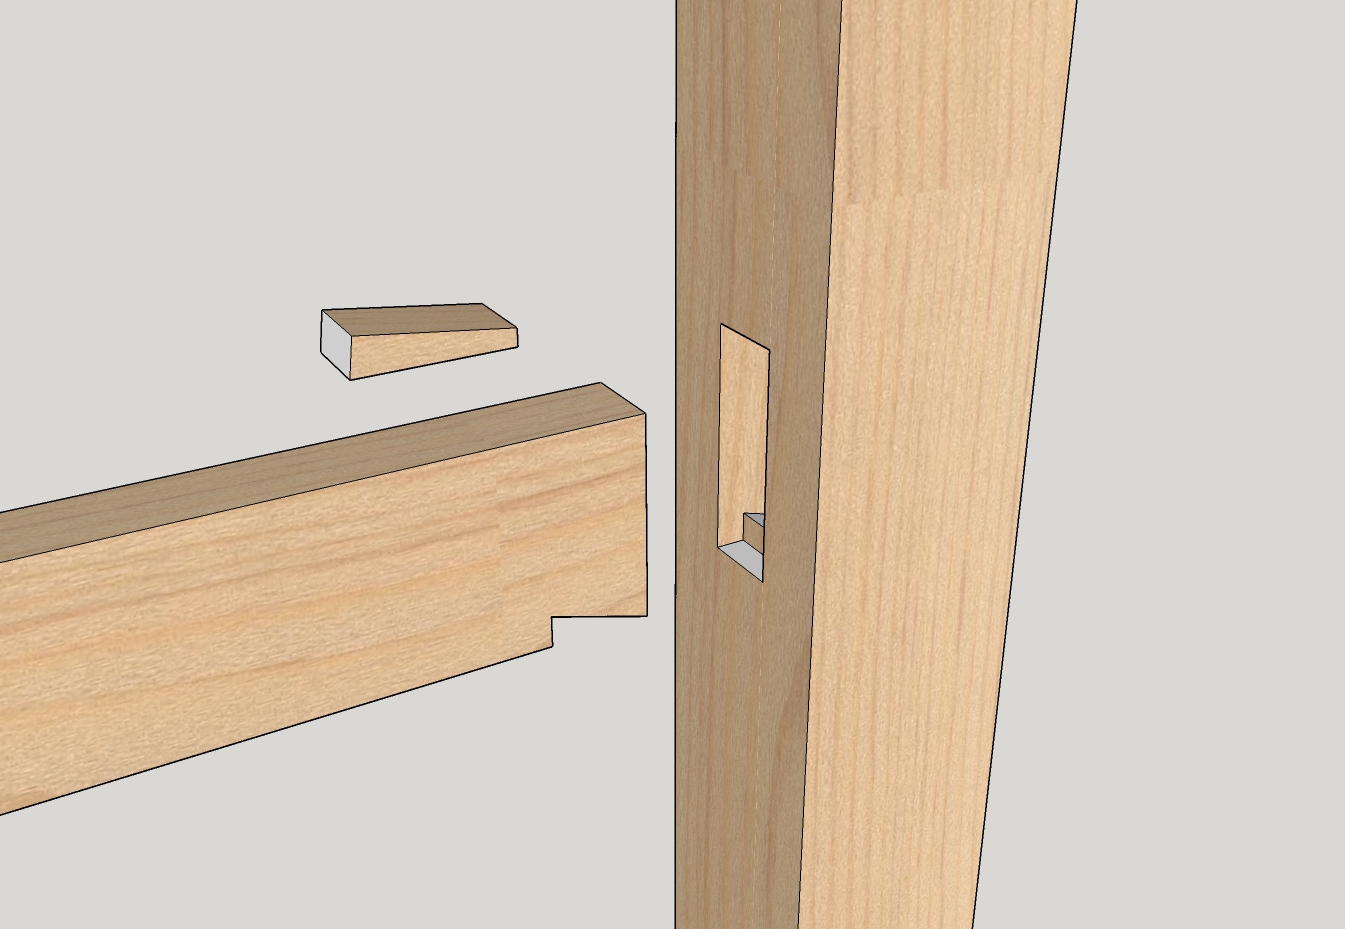
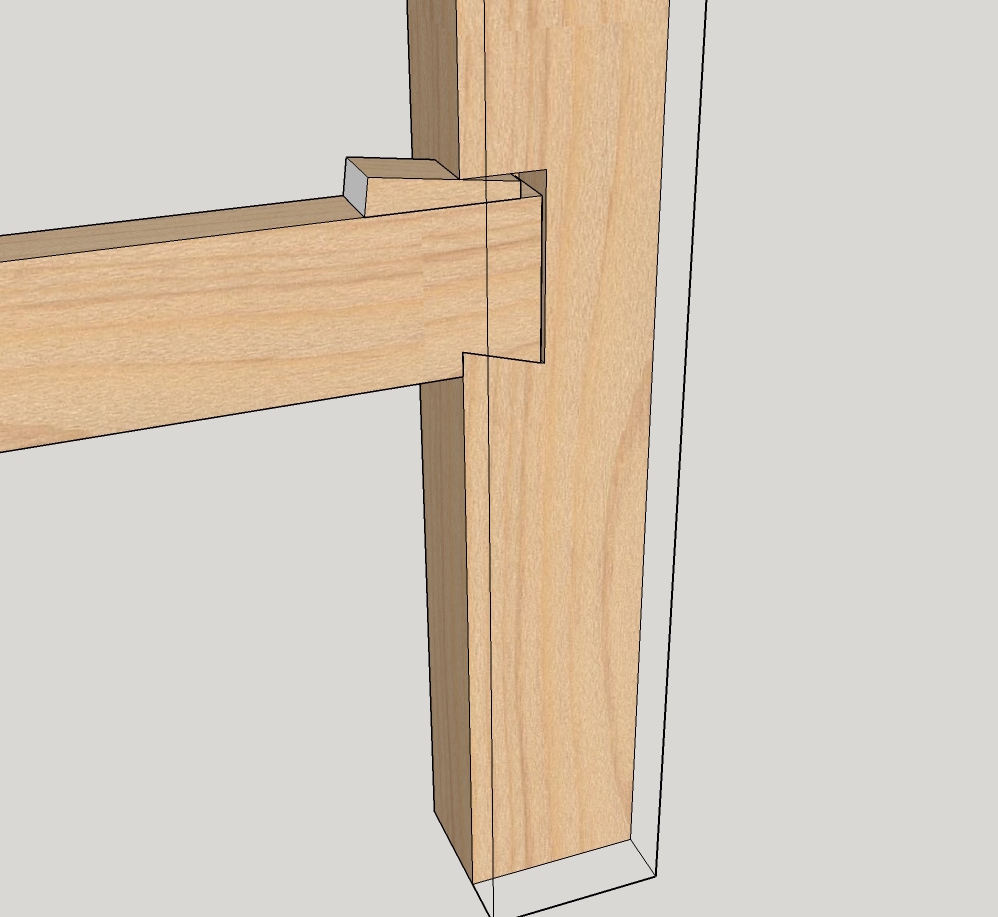
One joint developed to deal with both pushing and pulling loads features a half dovetail on the connecting end of the stretcher:
- Nuki to post connections k.jpg (347.79 KiB) Viewed 8013 times
The wedged dovetail portion resists tension loads, while the step abutment restricts further movement of the stretcher into the post.
This joint goes by more than one name, but it is not called
shita-ge-ari. It is termed either
kata sa-ge ari shiguchi ,
片下げ蟻, meaning 'half-dropdown ant (-shaped tenon) connection', or
otoshi- ari hozo shiguchi ,
落し蟻枘仕口, meaning 'lowered (-in) ant-shaped tenon connection'. The term
shiguchi simply means 'right-angled connection'.
There are a couple of different proportioning schemes out there for relating the parts to one another, but it is important that this joint be fully drawn out to make sure there are no internal points of conflict rather than slavishly following a proportioning scheme. It's funny how layout errors can crop up with a joint if you do not fully consider the details.
One proportioning system makes parts of the joint equal to 1/7 of the stretcher height. In designing a connection on this basis, it would be convenient to have the part dimensions be even multiples of 7. The other proportioning system makes use of 1:8, and is the one illustrated below.
I made the post face width and the stretcher section height in these drawings 120mm; 1/8 of that is 15mm.
15 mm is used then to set joint dimensions; it is the depth into the post into which the stretcher is housed, and it is the height of the narrow neck of the half dovetail, as measured up from the bottom edge of the stretcher.
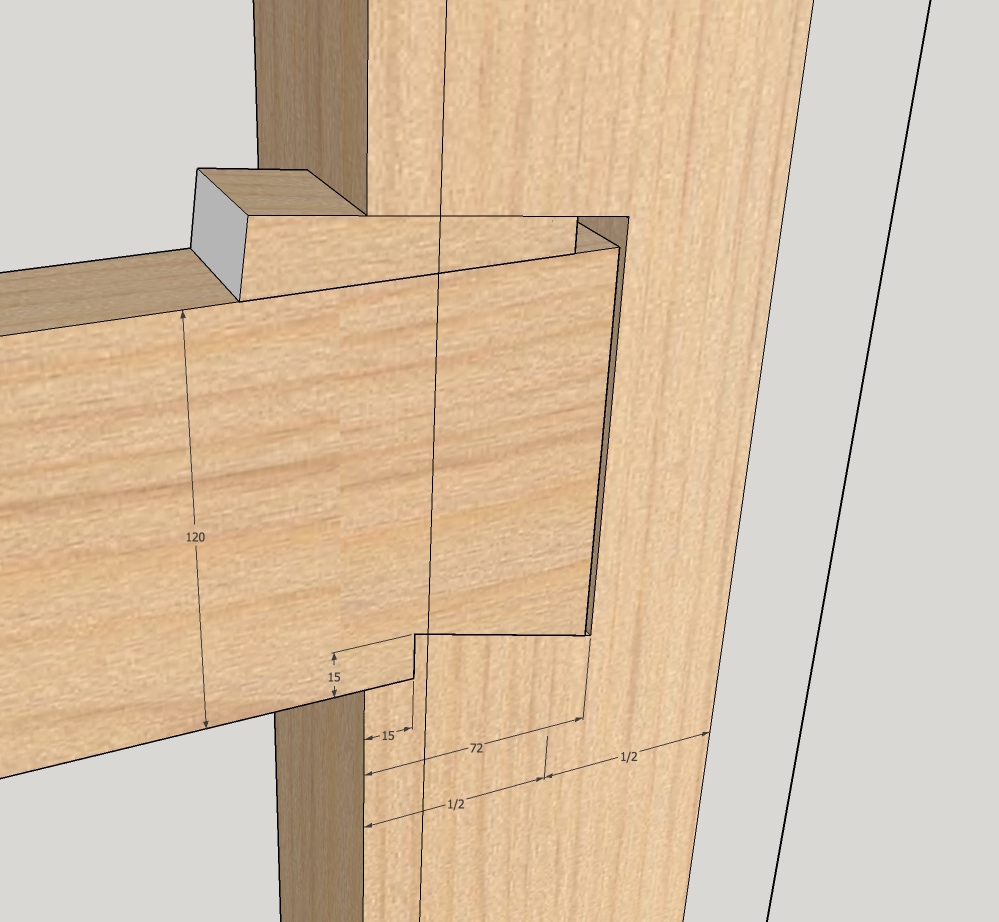
In this view with the parts assembled, and the post partially cut away, we can see that the dovetail mortise depth is a little more than 1/2 the thickness of the post:
- Nuki to post connections j.jpg (399.79 KiB) Viewed 8013 times
The mortise depth formula is: depth of the mortise is the thickness of the post divided in half, to which you add 12mm. That is 120mmm post divided by 2 is 60mm, +12 mm = 72mm. The mortise is 72mm deep, and the tenon length is held a slight amount back from that to accommodate wood movement in the post, at 70mm.
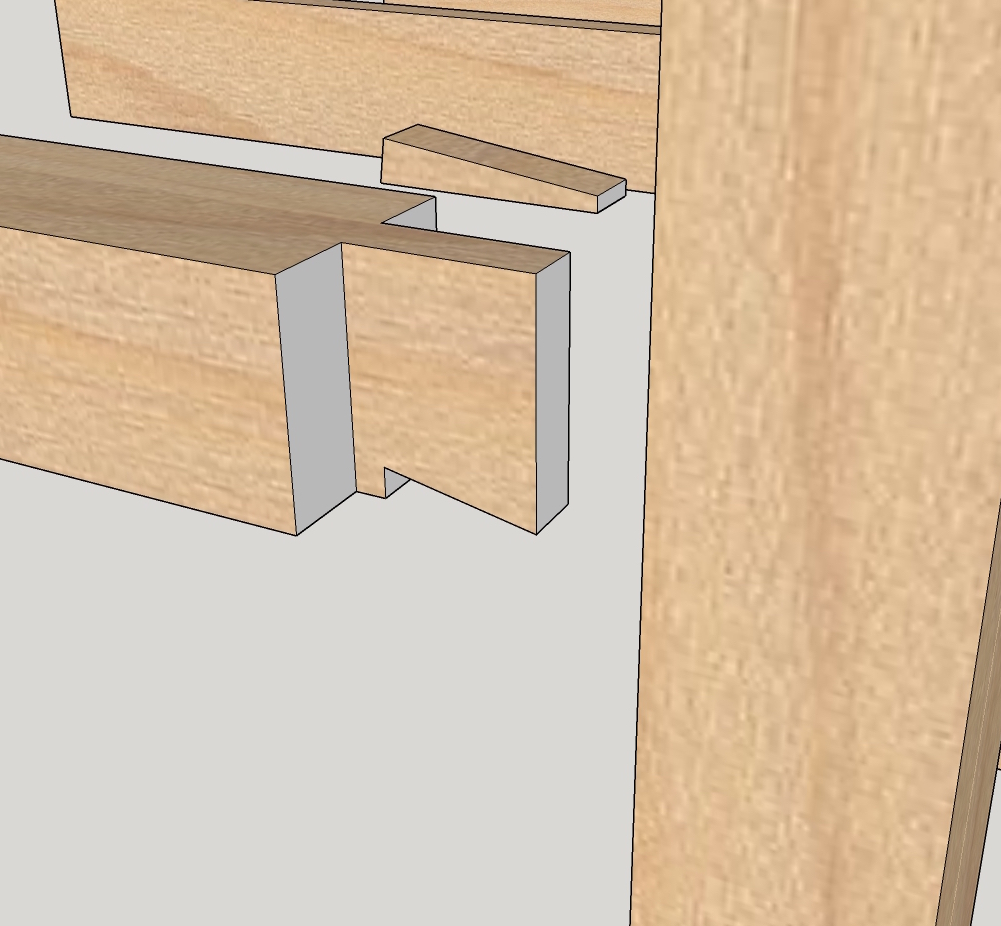
That is one option for proportioning. Another is to make the connection significantly deeper, with the mortise pushed all the way back to 3/4 of the post section thickness:

- Nuki to post connections r.jpg (361.75 KiB) Viewed 8013 times
The deeper connection is seen in the foreground. Given a 120mm post section, 3/4 of that would result in a 90mm deep mortise. The tenon would be 88mm long.
The wedge, or
kusabi, which secures the connection, is ramped at an angle of 1:8 or so. The ramped surface is matched on the upper end wall of the mortise, so the wedge fits just like a hand in a glove.
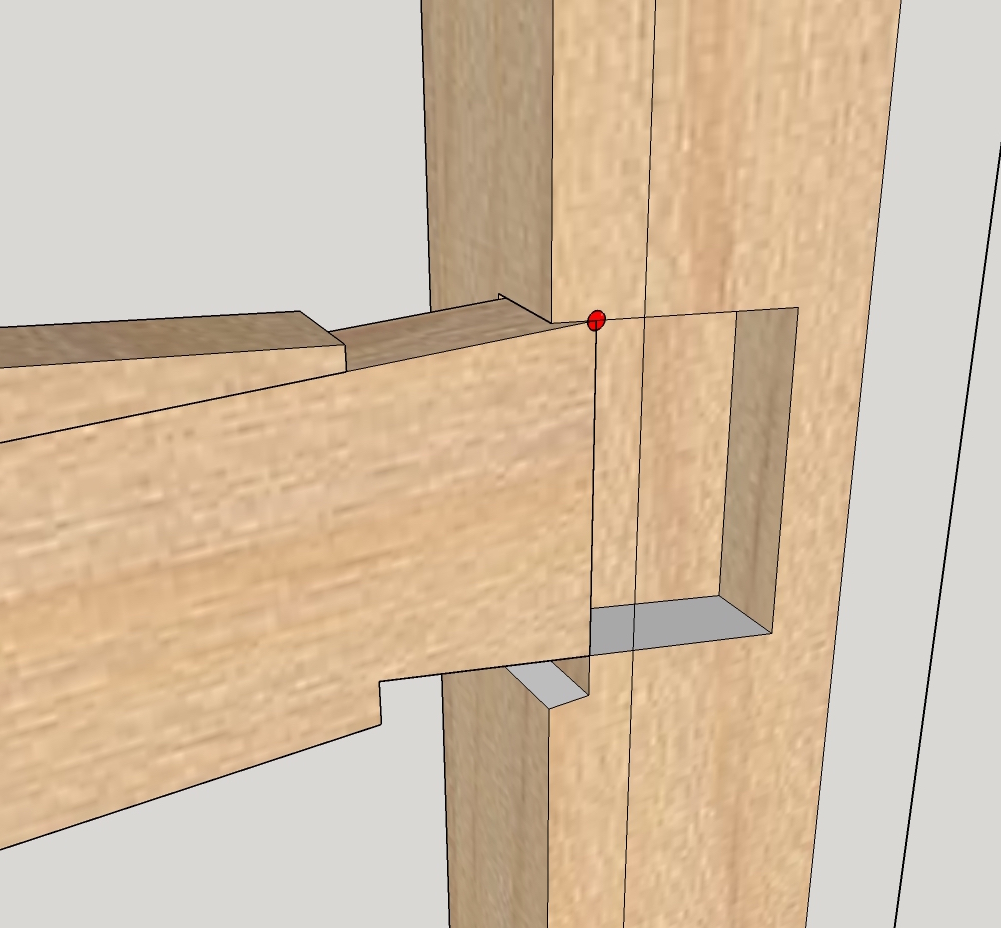
The most important thing to consider, when laying out this joint, is that the fat head of the dovetail is met by a mortise with the same height, and this height is measured not on the surface of the post, but at a depth of 15mm (the 1:8 proportion again).
In the following illustration, the wedge is removed and the stretcher is withdrawn up the dovetail ramp to the most constricted portion of the mortise - note that where the top of the tenon meets the upper mortise wall, marked with a red dot, is the very lowest position at which the upper mortise wall can be located:
- Nuki to post connections s.jpg (310.07 KiB) Viewed 8013 times
So long as the dovetail head will clear that narrow mortise opening, the joint will go together well.
This joint may be employed in situations where the stretcher is the same thickness as the post, as illustrated, or at some thickness greater than the tenon:
- Nuki to post connections q.jpg (326.86 KiB) Viewed 8013 times
A view now showing 3 versions of the housed half dovetail joint:
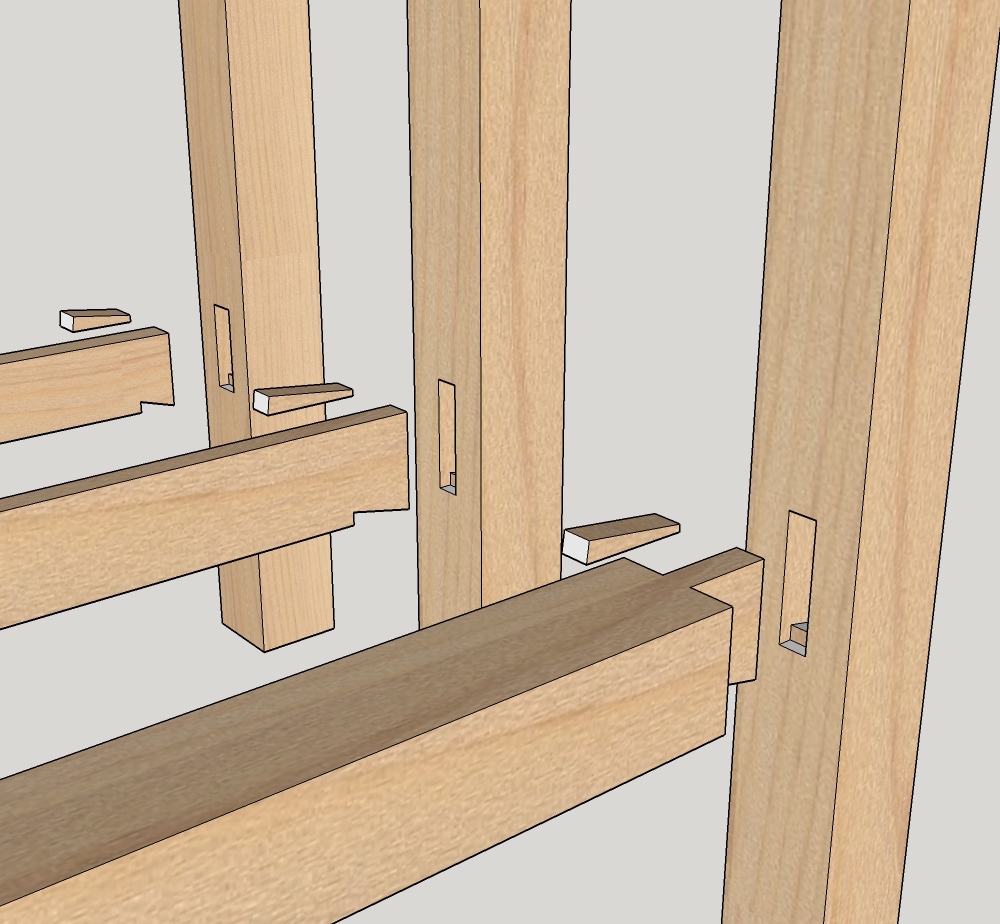
- Nuki to post connections p.jpg (478.83 KiB) Viewed 8013 times
The same three assemblies fully connected:
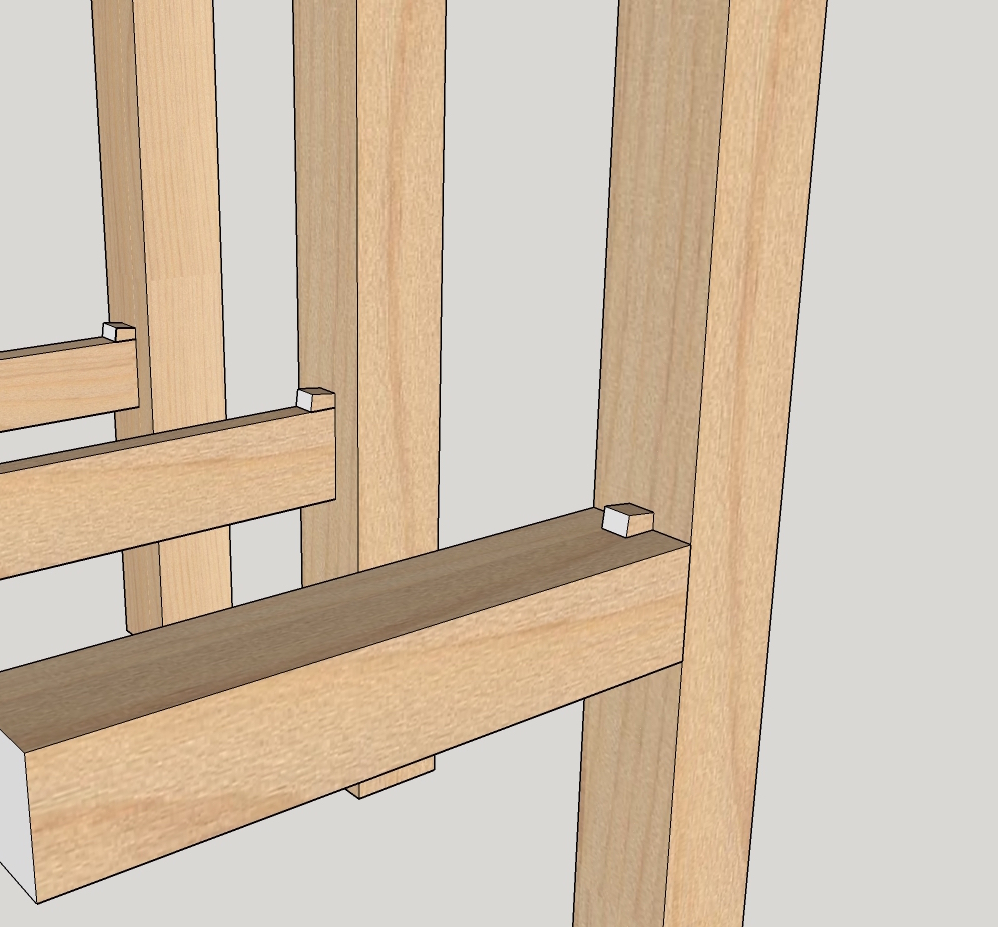
- Nuki to post connections o.jpg (400.92 KiB) Viewed 8013 times
In house framing where the stretcher connection will be buried under an earthen wall infill, a simpler, non-housed version of the joint is commonly employed:
- Nuki to post connections u.jpg (269.9 KiB) Viewed 8013 times
Note that the upper mortise wall is not cut on slope to match the wedge's upper surface, rather the upper mortise wall is simply cut squarely in. Not quite as strong a joint as the housed version, but quicker and cheaper to execute.